The last time I used the push notification service for this blog to send out a link to a new post, I noticed that in Chrome no notification was received. After some digging around it became obvious that they changed the API, so it was the right time to check and revise the current setup. So in this article I want to show how my current system works and the tools I used, which may be interesting for some of you.
One thing that was new for me was VAPID, which stands for Voluntary Application server Identification. As you can guess by the name, this optional ID helps to identify your application server, which enables a push server to restrict push notification to certain servers. This increases security, because if a push subscription datset would be stolen, the person could not send a notification from an other unknown server. Besides, additional data can be attached to a message with VAPID, for example the mail address of the application server’s operator.
Involved systems
So before showing the code, let’s go through the required main systems:
- The browser: Aka the user who wants to subscribe
- The application server: Your server which manages user subscriptions
- A push service(in this case GCM):
In the sequence diagram below I sketched the basic workflow for creating a push subscription. Please note that there’s no error handling, as every step is dependent on the success of a previous one.
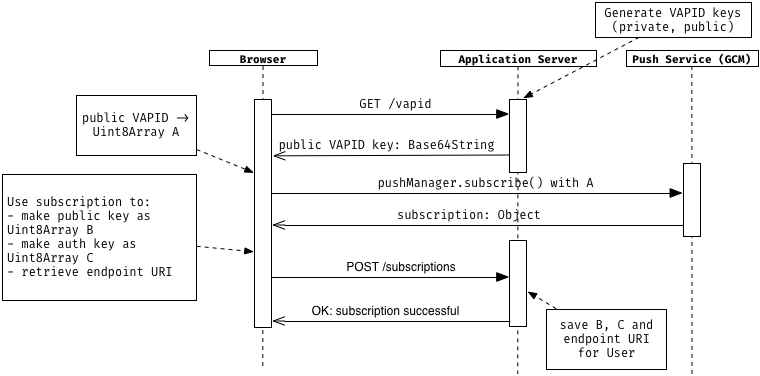
1. VAPID keys
First, we generate the VAPID keys on the application server. You get a private you’re going to keep secret and a public key you’re going to send out to the user. A simple way to do this is installing the global web-push package, which generates the VAPID keys and can even send notification both from CLI.
npm install web-push -g
web-push generate-vapid-keys
The output contains both VAPID keys which you need on the application server.
In the diagram you see that the User starts a request on /vapid, which returns the public VAPID key as a Base64String. You could also provide the VAPID key right from the start, this additional request is not needed.
2. Subscribe to the push service
After we got the public VAPID key, we convert it to a Uint8Array, which we call A.Now we ask via the push manager a push service, in this case Google’s GCM, for a subscription and while passing A. The service then creates a new subscription and connects it with the VAPID key, so only push requests from this server are valid. Then it sends us back the subscription object, which consists of the following important properties:
- endpoint URL: An URI containing the endpoint associated with the push subscription
- auth key: An authentication secret
- p256dh key: A public key for “Elliptic curve Diffie–Hellman” encryption
A stringified version as JSON could look like this:
{
  "endpoint":"https://android.googleapis.com/gcm/send/f1LsxkKphfQ:APA91bFUx7...kq_A",
  "keys":{
    "p256dh":"BLc4xRzKlKORKWlbdgFaBrrPK3yd..rds=",
    "auth":"5I2Bu2oKdyy9CwL8QV...Q=="
  }
}
Both keys are converted to a Uint8Array and are required for payload encryption. If you’re interested how this encryption works in detail, you can take a look at Mat Scales’ in-depth post. Definitely, both keys and the endpoint URL are sent to the application server, which persists this data as a successful subscription. When all of this is done, the overall subscription process is complete and you’re ready to send push notifications.
The following code snippet shows a corresponding function:
function subscribe() {
  return fetch('your-application.server/vapid')
  .then(response => response.text())
  .then(vapidKey => {
    const vapidKeyArray = urlBase64ToUint8Array(vapidKey);
    return navigator.serviceWorker.ready
    .then(function(registration) {
      return registration.pushManager.subscribe(
        {
          userVisibleOnly: true,
          applicationServerKey: vapidKeyArray
        }
      );
    });
  }).then(function(subscription) {
      return Promise.all([
        generatePublicKey(subscription),
        generateAuthKey(subscription),
        subscription
      ]);
    })
    .then(function([userPublicKey, userAuthKey, subscription]) {
      return fetch('your-application.server/subscription', {
        method: 'post',
        headers: { 'Content-type': 'application/json' },
        body: JSON.stringify({
          endpoint: subscription.endpoint,
          userPublicKey: userPublicKey,
          userAuth: userAuthKey
        })
      });
    });
}
Note that the functions generatePublicKey(), generateAuthKey() and urlBase64ToUint8Array() are simple helper functions to keep the code simple. I’ve put their implementation in this little gist. Another point which important in this code is using userVisibleOnly: true when subscribing via the pushManager. This flag indicates that your application will always show a notification when receiving a push message and is required in Chrome for UX and security concerns.
3. Send a notification
To get a quick overview of the process of sending a notification, I’ve sketched another sequence diagram:
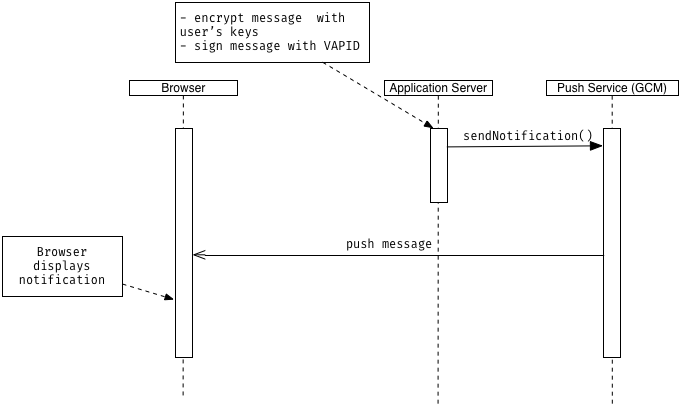
Here, we start with a signal reaching the application server saying that we want to dispatch a push notification with a message as payload to all of the subscribed users.
For instance, this could be done as a command in the terminal or via a web interface and is entirely up to you. I chose a simple REST API request providing the payload information which should be attached to the message.
For each subscription in the database you retrieve the keys and the endpoint URI. Additionally, the VAPID keys are loaded to sign the message appropriately. Then, we could make use of web-pushs sendNotification() method in the following way:
function sendNotification(endpoint, userPublicKey, userAuth, payload) {
  // Unset payload if encryption is not possible
  if(!userPublicKey || !userAuth) {
    payload = undefined;
  }

  const pushSubscription = {
    endpoint: endpoint,
    keys: {
      p256dh: userPublicKey,
      auth: userAuth
    }
  };

  const options = {
    vapidDetails: {
      subject: 'foo@bar.de',
      publicKey: process.env.VAPID_PUBLIC_KEY,
      privateKey: process.env.VAPID_PRIVATE_KEY
    },
  };
  return webPush
    .sendNotification(pushSubscription, payload, options)
    .then(function() {
      // Notification was sent successfully
    })
    .catch(function(err) {
      // Something went wrong
    });
}
You see that the VAPID keys generated in the previous step, are retrieved as environment variables, but they surely can be stored elsewhere. The rest of the code is just constructing the arguments the sendNotification() method needs.
Now it’s up to the push service to deliver the message. As soon as the browser has connection to it, a push event gets dispatched in the browser, which a service worker can listen to. You can then access the data attached to the push message and create a notification:
self.addEventListener('push', function(event) {
  const payload = event.data ? event.data.text() : null;
  event.waitUntil(self.registration.showNotification('My title', {
    body: `The payload: ${payload}`
  }));
});
Wrapping it up
I hope I could give you some insights how the web push notification process can be done and how I used it for my blog. The overall subject is huge and there are surely much more things to consider. Especially by having various systems (minimum: browser, application server and push service), there’s a lot of room for potential bugs and misunderstandings. If you’re interested in this technology, I can only recommend to build a little example for yourself to get a feeling for it and to take a look at Matt Gaunt’s well-written and approachable web-push book.
Useful resources:
- The web-push book: https://web-push-book.gauntface.com
- The web-push documentation: https://github.com/web-push-libs/web-push
- Good and detailed post about web-push and vapid: https://rossta.net/blog/using-the-web-push-api-with-vapid.html
- The draft specification of web-push: https://tools.ietf.org/html/draft-ietf-webpush-protocol-12